search
Loading...
Compression Springs Compression Springs

Enter your Outside Diameter and Free Length
Hint: For larger search results, enter a bigger range of Min and Max Inputs

Outside Diameter
to
Inside Diameter
to
Free Length
to
Wire Diameter
to
Total Coils
to
Rate
to
Material Type
Max. Load
to
Max. Deflection
to
Solid Height
to
*Required Field
Extension Springs Extension Springs

Enter your Outside Diameter and Length Inside Hook
Hint: For larger search results, enter a bigger range of Min and Max Inputs

Outside Diameter
to
Length Inside Hook
to
Wire Diameter
to
Max. Load
to
Max. Deflection
to
Initial Tension
to
Rate
to
Material Type
*Required Field
Torsion Springs Torsion Springs

Enter your Outside Diameter and Total Coils
Hint: For larger search results, enter a bigger range of Min and Max Inputs

Outside Diameter
to
Inside Diameter
to
Total Coils
to
Free Position
to
Wire Diameter
to
Body Length
to
Max. Torque
to
Max. Deflection
to
Rate
to
Leg Length
to
Material Type
*Required Field
Conical Springs Conical Springs

Enter you Small Outside Diameter, Large Outside Diameter and Free Length
Hint: For larger search results, enter a bigger range of Min and Max Inputs

Small Outside Diameter
to
Large Outside Diameter
to
Free Length
to
Rate
to
Total Coils
to
Solid Height
to
Wire Diameter
to
Material Type
*Required Field

In simple terms, spring load is the force a spring exerts at a specific compressed height (often called a working load at that height), while spring rate (also known as spring constant) is the force per unit of distance the spring deflects. Understanding spring load vs spring rate earlier would have saved me from a lot of trial and error! In this guide, I’ll break down the difference between spring load and rate, show how one derives from the other with a simple formula, and even share the full spring rate formula for those who want to do their own calculations. Trust me, once you grasp these concepts, you’ll be able to design or choose the right spring with confidence. 

What is spring load?

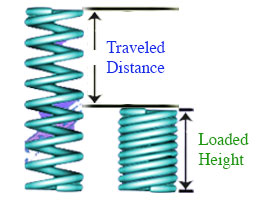
Spring load is the amount of force a spring exerts at a given compressed length (or loaded height). In other words, it’s the force at a specific deflection of the spring. For a compression spring, this usually refers to the force when the spring is compressed down to a certain height. This force is sometimes called a “working load” because it’s the load the spring will support in your application at that working position. For example, if you compress a spring to half its free length, the spring load is how many pounds of force it is pushing back with at that point. 

Think of spring load as the result of applying force to a spring: compress the spring by a certain amount, and the spring pushes back with a certain load (force). If you compress the spring more (smaller height), the load increases; if you compress it less, the load decreases. It’s important to know the spring’s load at specific heights to ensure your design has the necessary force. Many spring catalogs list loads at various heights (including at solid height, which is when the spring is fully compressed) so you can see how the force increases as the spring deflects. 

spring load compression springspring load compression spring

What is spring rate?

Spring rate is the constant amount of force a spring exerts per unit of distance it is compressed (or extended). Essentially, it measures the stiffness of the spring, how hard you have to push or pull the spring to move it a certain distance. Spring rate is expressed in units like pounds-force per inch (lb/in) or Newtons per millimeter (N/mm). For example, a spring rate of 5 lb/in means it takes 5 pounds of force to compress the spring by one inch. If you compress it 2 inches, it will exert about 10 pounds of force (assuming the spring stays within its linear elastic range).

You can think of spring rate as the slope of the force vs. deflection curve for the spring. For most metal coil springs (within normal operating range), this relationship is linear, meaning the spring rate is constant, and the force increases proportionally with deflection. This linear behavior is described by Hooke’s Law, which states that the force F a spring exerts is proportional to the deflection x, with k (spring rate) being the proportionality constant: F = k · x. A higher spring rate means a stiffer spring (it takes more force to compress it a given distance), while a lower spring rate means a softer spring. Manufacturers often refer to spring rate as the spring’s “constant” because, for a given spring design, this value doesn’t change until you exceed the elastic limit.

spring rate compression springspring rate compression spring

What is the difference between spring load and spring rate?

It’s easy to confuse spring load with spring rate, but they refer to related, yet distinct, concepts. The key difference is that spring rate is a constant (force per unit distance), while spring load is a specific force at a specific deflection. Spring rate tells you how hard it is to compress the spring, whereas spring load tells you how much force the spring is applying at a certain compressed length. 

Another way to look at it: spring rate is a property of the spring (like stiffness), and spring load is an outcome given a certain compression. If you know the spring’s rate, you can find the load at any deflection; if you know the desired load and deflection, you can find the required rate. They are two sides of the same coin, connected by the simple formula of Hooke’s Law (more on that next). For example, Access Spring’s Stock Part Number PC060-1250-9350-MW-4000-C-N-IN, a spring with a rate of 1.5 lb/in will have a load of 3 lb at 2 inches of compression, and a load of 4.5 lb at 3 inches, and so on, the rate stays 1.5 lb/in throughout. The load changes with the amount of travel, but the rate is constant for that spring.

PC060-1250-9350-MW-4000-C-N-IN-3d-viewPC060-1250-9350-MW-4000-C-N-IN-3d-view
PC060-1250-9350-MW-4000-C-N-IN-osftPC060-1250-9350-MW-4000-C-N-IN-osft

When I first worked with springs, I didn’t realize this relationship. I mistakenly thought “spring load” was an independent spec I had to look up, separate from spring rate. In reality, if someone gives you the spring rate, you can calculate the load at any height you need (and vice versa). This means you have flexibility in specifying your spring: you can either specify a needed load at a certain compression (and derive the rate), or specify a spring rate (and know what load it will produce at your working height). Understanding the difference ensures you communicate correctly when designing or ordering a spring, for instance, saying “I need a spring that exerts 50 lb at 1.5 inches of compression” is equivalent to saying “I need a spring with about 33 lb/in rate” (since 50 lb / 1.5 in ≈ 33 lb/in). 

How do you calculate spring load?

Calculating the spring load at a given deflection is straightforward using Hooke’s Law. The formula is:


Load = Rate×Travel


In symbols, F=k⋅x, where F is the force (spring load), k is the spring rate, and x is the distance the spring is compressed (often called deflection or travel). Essentially, you multiply how far you compress the spring by the spring’s rate to get the force.

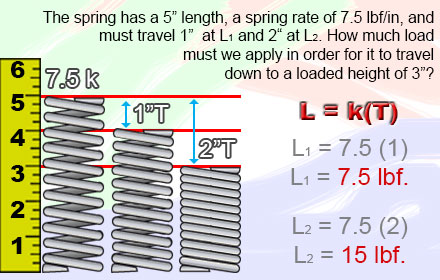
For example, I had Acxess Spring’s Stock Part Number PC060-734-19000-MW-5000-C-N-IN a spring with a free length of 5 inches and a spring rate of 3.577 lb/in. I needed to know the load when the spring was compressed down to 3 inches in length (this 3-inch length was the space in my device for the spring at maximum compression). The travel in this case is the difference between the free length and the compressed length: 5′′−3′′=2′′ of compression. Using the formula:

  • Rate k = 3.5777 lb/in

  • Travel x = 2 in

  • Load F = k×x = 3.5777×2 = 7.154 lb

PC060-734-19000-MW-5000-C-N-IN 3d viewPC060-734-19000-MW-5000-C-N-IN 3d view

So the spring will exert 7.154 pounds of force when compressed to 3 inches height. This is the working load at that height. We can double-check that reasoning: since the rate is 3.577 lb/in, every inch of compression adds 7.5 lb of load. Two inches add 7.154 lb, it’s linear.

This spring force calculation is very useful. It lets you predict how much force your spring will apply in your assembly at a given compressed length. If that force is too low or too high for your needs, you’ll know you might need to choose a different spring or adjust the spring rate. Calculating spring load is as simple as multiplying, and it works in any units (just be consistent: e.g., if k is in N/mm, distance must be in mm to get force in N).

(Quick tip: If math isn’t your strong suit, you can use our Online Spring Force Calculator or just reach out to us, we can help calculate the loads for your custom spring.)

How do you calculate spring rate?

You can also start from the opposite direction: calculate the spring rate you need if you know your desired load and the distance (travel) at which that load is needed. Rearranging the same formula (F=k⋅x), you get:

Spring Rate = Load ÷ Travel

In symbols, k = F ÷ x. 

This is handy when you have specific requirements: for instance, you might know that in your design the spring can only compress by 1.5 inches, and at that compression it needs to push back with 50 pounds of force. Using the formula: k=50 lb/1.5 in≈33.3 lb/in. In this case, you’d look for a spring rate of roughly 33 lb/in (or design a custom spring to that rate).

Let’s double back to my earlier example with Acxess Spring’s Stock Part Number PC060-734-19000-MW-5000-C-N-IN to illustrate this. We found that a 3.577 lb/in spring compressed 2 inches gave a 7.154 lb load. If we only knew the 7.154 lb load and the 2 inch travel (but not the rate), we’d calculate the required spring rate as 7.154 lb/2 in=3.577 lb/in. Sure enough, that’s the spring rate we started with. This just confirms the relationship works both ways.

PC060-734-19000-MW-5000-C-N-INPC060-734-19000-MW-5000-C-N-IN

In real scenarios, this means if you have a target force in mind and a space constraint (how much the spring can compress), you can determine the needed rate easily. Then you can either find a stock spring close to that rate, or have one made. Keep in mind that spring rate is also influenced by the material and geometry (next section), so not every combination of dimensions will perfectly hit your calculated rate, but it gets you in the right ballpark. If the number comes out unusual (say 33.3 lb/in), you might round to a convenient standard rate or adjust the design.

Lastly, note that this calculation assumes linear behavior (no coil binding or nonlinear effects). It’s valid as long as you’re within the spring’s elastic range (not past its maximum load or travel). If you calculate a needed rate that seems very high or low, it might indicate an extreme design, consider consulting a spring engineer (our team is happy to help) to make sure the spring will perform safely and reliably.

What is the full spring rate formula?

So far, we’ve treated spring rate as a given constant or something you calculate from load and travel. But what actually determines a spring’s rate? For those who want to design a spring from scratch or understand the factors, there’s a well-established formula for the spring constant k of a metal coil compression spring. The full spring rate formula is:


k = (G * d^4) / (8 * D^3 * n)


Where each variable is defined as follows:

  • d – Wire diameter (thickness of the spring wire). A thicker wire makes the spring stiffer (and d is to the fourth power in the formula, so even small increases in wire diameter significantly raise the spring rate!).

  • D – Mean coil diameter. This is the average diameter of the spring’s coils, usually calculated as the outer diameter minus one wire diameter (since mean diameter is halfway through the wire thickness). A larger coil diameter makes the spring softer (since the wire is bending over a larger radius) – note D is cubed in the denominator, so bigger coils reduce the rate.

  • n – Number of active coils (the coils that actually deform when the spring is compressed). More active coils make the spring less stiff, because the force is distributed over more coils (rate is inversely proportional to n). Coils that are touching the ends or ground flat typically don’t count as “active.”

  • G – Shear modulus of the spring material, in consistent units (for steel, G is on the order of 11.5 million psi in imperial units). G is a material property that measures rigidity – higher G (like in music wire or certain alloys) means a stiffer spring for the same geometry.

This formula comes from the physics of a helical spring acting like a torsional bar. You don’t need to derive it yourself, but it’s good to know it exists and what the variables mean. What I wish I knew earlier is how much each factor influences spring rate. For instance, because of the d^4 term, even a slightly thicker wire can dramatically increase the rate (stiffer spring). Conversely, adding just one or two coils (increasing n) can noticeably reduce the rate, if you need a softer spring. Increasing the coil diameter D will also reduce the rate (making the spring easier to compress). Material comes into play via G, using a material with a higher shear modulus (like music wire vs. bronze) can increase the rate if all else is equal.

how to measure a compression springhow to measure a compression spring

Most of the time, you won’t calculate this by hand, you can use our spring design calculator or have our engineers do the heavy lifting. But having this formula in your back pocket means you understand what affects spring stiffness. It empowers you to make informed decisions: Do I increase the wire size or reduce the coil count to get the higher load? Will using stainless steel (with a slightly different G) change the rate much? These are the kind of questions that, once upon a time, I didn’t know how to answer. Now I do, and you do too!

(If you’re curious, plug in some numbers for a hypothetical spring and see how k changes. Or try our Spring Creator 5.0 tool where you input dimensions, and it calculates the rate for you, it’s a quick way to validate your design.)

What is maximum spring load?

Every spring has a limit to how much force it can take, this corresponds to the maximum spring load, typically achieved at the spring’s solid height. Solid height is the height of a spring when fully compressed (all coils touching each other). At that point, the spring can’t compress any further, and the load you’ve applied is as high as it gets. The maximum spring load is essentially the load at solid height (sometimes called solid height load). Going beyond this load is not possible without deforming or damaging the spring. In fact, if you try to compress a spring past its solid height, all you’ll do is cause permanent set or even break the spring.

You don’t want to design a spring to be used exactly at solid height if you can avoid it. It’s often good to leave a little safety margin (so the spring isn’t completely stacking up), which can improve the spring’s life by avoiding excessive stress. However, you do need to know what the solid height load is to make sure you never demand more force from the spring than it can physically provide. Exceeding the maximum load can distort or fatigue the spring, leading to failure. For example, if a spring’s solid height load is 100 lb, using it much beyond 100 lb will likely permanently bend the coils or crack the spring. 

How do you determine the maximum spring load? You can calculate it the same way as any other load: use the spring’s rate and the maximum travel (which is from free length down to solid height). For instance, if our spring from earlier has a free length of 5 inches and a solid height of 3 inches, the maximum travel is 2 inches. With a rate of 3.5777 lb/in, multiply 7.5 * 2 = 15 lb, that would be the solid height load. Indeed, in our example that 3-inch height was the solid height, and 15 lb was the max load. If we tried to compress that spring more than 2 inches, we’d be at coil bind and likely damage it.

When you look at spring specs, you might see “maximum load” listed, that’s the force at solid (sometimes they also list “maximum deflection” which is the distance to solid). It’s a red line not to cross in your design. If your required load is near or above that, you need a stiffer spring (higher rate or different design) to handle the force without fully compressing. To be safe, staying a bit under the max load (e.g. using 90% of the available deflection) can prevent spring fatigue over many cycles.

compression spring stress setcompression spring stress set

Maximum spring load is the top-end force a spring can provide when fully compressed. It matters because it marks the boundary between normal operation and potential spring failure. Always check this value, especially if you’re pushing springs close to their limits, to ensure reliability. And if you’re unsure, our spring engineers can help you interpret a spring’s specs or suggest modifications so you don’t accidentally design a spring that will coil bind or break in service.

Remember These Key Points

Designing or selecting the right spring becomes much easier once you understand the relationship between spring load and spring rate. From my experience, grasping these basics can save you from headaches like picking a spring that’s too weak to do the job or one that bottoms out and gets damaged. Here’s a quick recap of the key takeaways about spring load and spring rate:

  • Spring load = Force at a specific height: It’s the amount of force a spring exerts at a given compressed length (the working load at that position). Always consider the load at the height your application requires to ensure the spring meets your force needs.

  • Spring rate = Force per unit distance: This constant value (e.g., in lbs/in) tells you the spring’s stiffness. A higher rate means a stiffer spring. It’s the key to calculating how load builds up as the spring compresses (or extends).

  • The two are linearly related (Hooke’s Law): Within a spring’s elastic range, Load = Rate × Deflection. This means you can easily calculate one if you know the other. This simple formula (k·x = F) is your best friend for spring design – use it to find spring load at any compression, or to find what spring rate you need for a target load.

  • Full spring rate formula shows what affects stiffness: k = Gd^4 ÷ (8D^3 * n). Wire diameter, coil diameter, number of active coils, and material (shear modulus) all influence the rate. This tells you how to tweak a spring design – e.g. thicker wire or fewer coils for a higher rate (stiffer spring), or vice versa.

  • Always mind the maximum spring load: The load at solid height is the absolute limit. Pushing a spring beyond its max load/deflection can cause permanent deformation or failure. Design with some safety margin and verify the spring’s solid height load, so your spring won’t coil bind or get overstressed in operation.

With these fundamentals in hand, you’re better equipped to design or select a spring that perfectly meets your requirements. Keep the relationship between load and rate in mind, and you’ll avoid common pitfalls like undershooting (spring too soft) or overshooting (spring too stiff or compressed solid). Remember, you don’t have to figure it all out alone, if you need help calculating spring forces or designing a custom spring, contact our team of spring experts. We’re here to ensure you get the optimal spring for your project, with the right load, rate, and reliability. Happy spring designing!